Showing posts with label Updo. Show all posts

Sunday, August 28, 2011

Short Hair- Glamorous Style

I have SOO many clients who think they need to grow their hair out before a big event. They think that having it long will give them more options with a glamorous style. Maybe having more length does give you more options, but there are still so many styles for hair that is shoulder length and shorter.
One of my clients on Saturday was a bridesmaid with gorgeous short hair. Meg, wanted her style to look stylish and not dated. I worked a flat iron over the entire back to give her curl and volume. We wanted the front to be polished and not so huge, so I shaped the curls into a soft finger waves and pin curls. It isn't a tight finger wave, but it still gave the front of her hair structure and interest. I think Meg is a great example of a gorgeous short hair style for weddings or nice events.
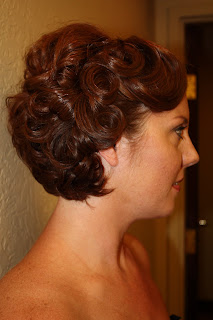
The point is, don't sweat it if your hair is on the shorter side and you have a big event coming up. There are many options for your hair. Just have a open mind and trust in your stylist, and you could end up with a beautiful style.

Wednesday, August 3, 2011

The Bow-Bun


I obviously failed in the picture taking department with these shots. What I wouldn't do for a tripod and remote. My photographer (aka Lincoln) was at work and I wasn't being patient enough to wait for him. I promise to do this again and have him take the pictures so you can get a better idea. I think my hair looks a little more Minnie Mouse then Lady Gaga.

Wednesday, July 13, 2011

Day 29- "Side Knot"


This prom season there were SO many girls that wanted their updo on the side rather than right in the back of their head. I am a big fan of this look. I love seeing it with a pretty flower or sparkly clip. I also don't think it is so dressy that you can't wear it during the day as well. I left my bangs out to add to the romance of the style. I am a big fan of flipping the bangs out when leaving them down. The rest of the hair was teased really well at the crown then pulled into a low side pony. I always take the pony on the opposite side of my part. After the pony is secured I twisted it around my hand almost like I was going to tie my hair into a knot, then secure the hair with a few bobby pins. Use the end of your rat tail comb under the hair at the crown to give it some lift. Spray it, and go.
Have a happy hair day!

Tuesday, July 12, 2011

Day 28- "The Lucille Ball"


When you have day two of curls like this, you don't want to get rid of them right away. I was surprised to see how in tact they were. Today was a super hot day and I had to wear it up. I had so many people tell me I looked like I was Lucille Ball or Emma. What do you think

Friday, July 8, 2011

Day 24-"Chignon"


Someone once asked what the difference between a bun and a chignon. Well, not much. If you look at the true definition, you will see that they are very similar.


chi·gnon

noun \ˈshēn-ˌyän also -ˌyȯn\

Definition of CHIGNON

: a knot of hair that is worn at the back of the head and especially at the nape of the neck

1bun

noun \ˈbən\
1
: a sweet or plain small bread; especially : a round roll
2
: a knot of hair shaped like a bun
3
plural : buttocks


It really is all relative. I would consider a chignon to be on the lower part (nape) of the head with a smoother shape. The bun can be anywhere on the head with a twisted or braid pattern. Like how I wore the back of my hair on day 4, I would consider that to by a bun. Really, I don't think the world would end if you called a bun a chignon and a chignon a bun. As long as it's pretty in the end. Right?


Have a happy hair day!


Wednesday, July 6, 2011

Day 22- "Knot so Hard"

Almost all of my updos start with what I taught on day 7. I almost always start with a little backcombing in the crown securing it with two bobby pins on either side. I then took my hair in three sections on either side of my head and just did a square knot all the way down until there was no hair left to tie. I secured with a few bobby pins and I was done. It was so easy.
You can leave your ends sticking out all crazy, or you can tuck them in. I promise I did this in no time. I even had little Clark around being cute. Just goes to show you, being a mom doesn't mean you have to have stupid hair.
Have a happy hair day!

Monday, July 4, 2011

Day 20- "Oh No She Didn't"


If you have not mastered the art of french braiding your hair by now, you probably think all is lost in ever learning how. I would like to challenge that way of thinking by telling you that you CAN do it. There are so many people out there who struggle with the simple task of weaving their hair back and forth while picking up small strands of hair to join the weave. I promise it is all about practice. I would suggest you get the hang of it on someone else's head first if you are really struggling. It is all about seeing the pattern and keeping the sections clean. Here are the simple steps to remember when french braiding.

1. Only make one pass of each strand before picking up small sections to join with the two outside strands.
2.Hold the three strands of hair in one hand, in between different fingers, while the other hand picks up hair on either side.
3.Hold the hair as close to the base as possible, not at the ends where the hair will braid too loose and fall out of the braid.
4. Make sure each section you pick up is the same amount of hair each time.
5. Repeat over and over until you reach your hairline, or your desired spot.


I swear it is that easy!
I am trying to make my face have as much attitude as possible, am I pulling it off? Ok, maybe not. Just promise me you will try to french braid your hair if you don't know how, and if you do, try the dutch braid. You wont regret it.

Have a happy hair day!

There was supposed to be a new tutorial with a how to on french braiding, but I can't get it to work. So, I will have to have Lincoln post it tomorrow. It is late and if I wake him up to show me how I would be a bad wife. I promise you will get it tomorrow. Pinkie swear!

Friday, July 1, 2011

Day 17- "Sweet Swiss Miss" or "Almost Amish"


I am not too sure about this look. I see it on other people and I think it looks great. On me, however, it looks and feels a little Amish. I love the Amish, I just don't want to be mistaken for one. What do you think, does it work? Have you tried it? I think my braids got too thin on the ends and it didn't stay as think as it should on the top. Oh, well. It was a fun try
Oh, and don't mind the light fixture in the background. :)

Have a happy hair day! It's so good to be back!

Monday, June 27, 2011

Day 16- "Birthday Hair"

That's right, it's my birthday!! I am not one for making a big deal of my birthday, but it turned out to be a really nice day. Spending my day at work was not something I wanted to do, but it turned out fine. I was able to block out some time to have dinner with Lincoln and Clark before I headed back to finish a few more clients. I love living close to the salon!!!
To continue with "braid week" I did a dutch braid zig-zag across my head. A dutch braid is basically a regular braid, but inside out. You turn the hair out as you braid, and to get the zig-zag, you only pick up the hair for one side of the braid. Am I confusing you yet? Well, I will just have to do a video to show you. But for now, I am going to bed. It's my birthday after all, I am getting older and these late hours are killing me. :)

Have a happy hair day!!

Sunday, June 26, 2011

Day 15- "Rope-Braids"

Today marks the first day of "BRAID WEEK!" I hope you are all as excited as I am. I want to open your eyes to the wonderful world of braids and twists. Oh, my!
Today I wore my hair with two rope-braids down either side of my head. I finished the braids off in the middle back of my head, then I just twisted them up and secured them with bobby pins. SO EASY!


I actually fell asleep on the couch before Lincoln could take the picture, so it is a little frizzy, but still in tact.

I have many braid tutorials coming, AND.... A GIVEWAY!!! So, get excited.

Have a happy hair day!

Thursday, June 23, 2011

Day 12- "Ballerina Bun"

I LOVE the ballerina bun! It is the easiest style with the best response that I do. I studied ballet for a large part of my young life, so it is only natural for me to wear this style with pride. I know you have seen it around, but do you know how to do it? Well, now you do. Enjoy the tutorial.

FYI- I always smooth out the bun in the back when I am finished, I just didn't do it very well in the video. And, just in case some of you are using your Nancy Drew skill and wondering why I am wearing a different outfit in the video, I did the video on one of my days off. However, I swear to you that I didn't cheat and I did wear my hair like this today. The picture was taken after my long 11 hour day, and the bun is still going strong. I challenge you to give it a try and make it your own. I sometimes add a fabric flower or I twist the hair as I wrap it around. Do your thing and let me know how it goes.

Have a happy hair day!

Tuesday, June 21, 2011

Day 10- "Anniversary Hair"

Happy anniversary to Lincoln and me!!! It has been three awesome years. I wanted to do something fancy. I think you should all know that you can do something glamorous at home. It can't be as polished and perfect when you are doing it on your own head, but it can look great.I wanted to top and sides to be really soft and have everything just blend into the back.
I first start with tons of tight little curls all pined up on my head. I let them cool off and I just sort of get stuff done. This is when I would do my makeup, but since it was done, I just fead Clark. You can choose what you want to do...
After you take your curls down, they will be bouncy and soft. With your fingers just rake the curls back to a loose messy bun. The curls will hold and make it look fancy and nice. Use your bobby pins to secure the ends and spray it like crazy. The reason it doesn't sound technical is because it isn't. Just let it be organic and soft. Have fun and enjoy your sexy curls.

Have a happy hair day!


P.S. I did another tutorial today. Not for this hairstyle but another I will wear another day. I wanted to be prepared. It is one of my favorite hair styles, so get excited!!

Monday, June 20, 2011

Day 9- "The Bun-Hawk"

Who says you have to only wear one? I want to wear three. I like my buns to be nice and messy. I don't mind if there are hairs twisting out all over the place. It looks nice all sleek and polished too, but sometimes you need to just not worry about it. I challenge you to try it.
I always start with the top bun. I have my hair parted on the side and just sort of swept back with the hair. I think you can part it just about anyway you want. I have a tendency to twist my buns the same direction and when I pin them, I pin in a X . I use only about 3-4 bobby pins per bun. I usually rake my fingers along the sides to blend the part a little, give it some spray, and I'm out the door. Give it a try. This works with shoulder length hair too, you just might need to use rubber bands to hold the buns in place.

Have a happy hair day!

Wednesday, June 15, 2011

Day 4- "It looked better in person"


Sarah asked me to show more angles of the style. I did my best. It was a very busy day, so I am happy I wore my hair up. I love french braiding my hair. I learned how to do it by practicing over and over again on my sisters while they watched the Disney Family Movie when we were younger. Being able to do it on my own head as given me so much versatility. I will teach you one day if you ask very nicely. Ok, you don't even have to ask, I am dying to teach you. I am working on some video tutorials and I can't wait to share them.

Have a happy hair day!

Tuesday, June 14, 2011

Day 3- "Braids in the Park"

Today was a gorgeous day that was spent playing in the park. I wanted my hair off my neck and away from my face, and this style totally did that for me. Even though I did start to feel like a hip pioneer woman by the end of the day, I love braids in my hair. The twists and braids will be a reoccurring theme in this 30 day challenge.

I have heard your requests (both online and in person) and I am going to work on a few video tutorials to show you how I do some of my styles. I also plan on making some posts dedicated to product and hair color. Get excited.

Have a happy hair day!